First, we need to oil and reassemble the balance jewels. The shock-resistant jewels of the 642 are loose, so it's easy to put them together outside the movement. I forgot to photograph the process with the 642's Incabloc jewels, so I put together a jewel set from a Kif shockproof setting.
Start by placing a drop of watch oil (I use Elgin M56b) in the center of the cap jewel. Then place the hole jewel and setting on top of it. The oil will then hold the two together, and if you were careful in putting them together, the oil will be nicely centered.


Next, replace the oiled jewels back in the shockproof settings in the balance cock and pillar plate.


Next, I wind the mainspring into the barrel. Start by hooking the center coil onto the arbor of the winder. Then wind it into the barrel.


Leave a little bit of the barrel end of the spring outside to allow you to orient it in the barrel. Unwind the winder arbor, and then turn it backwards just a bit to disengage the mainspring.
Elgin's 8/0 watches have a 'T' end, which fits into slots in the barrel floor and the cap. Place the T end in the slot, lower the winder into the barrel and push on the plunger to insert the spring into the barrel.


With the spring in the barrel, add a few drops of heavy clock oil to the coils, insert the barrel arbor, CAREFULLY - again, the spring will try to throw it! Turn the arbor to engage hook on the arbor with the hole in the end of the spring.


Next, put on the barrel cap, lining the slot up with the T-end of the mainspring. Oil the barrel arbor where it exits the barrel, top and bottom.

Now we're ready to put it back together. Lightly grease the sides of the setting lever screw and insert it, and place the barrel in its recess in the pillar plate.

Starting with the escape wheel, carefully place the train wheels in their jewels.


Install the barrel bridge, making sure you see the pivots of the center and 3rd wheels, and screw down.

Next, install the train bridge. This is trickier. Often the 4th wheel pivot will drop into place, but the escape wheel pivot will need to be worked around until it is in the hole. At that point, the whole bridge often drops into place. Before screwing it down, spin the center wheel and observe the other wheels of the train, especially the escape wheel. It should spin smoothly for some time, slowing to a stop. Screw the bridge down, checking the spin of the train again.

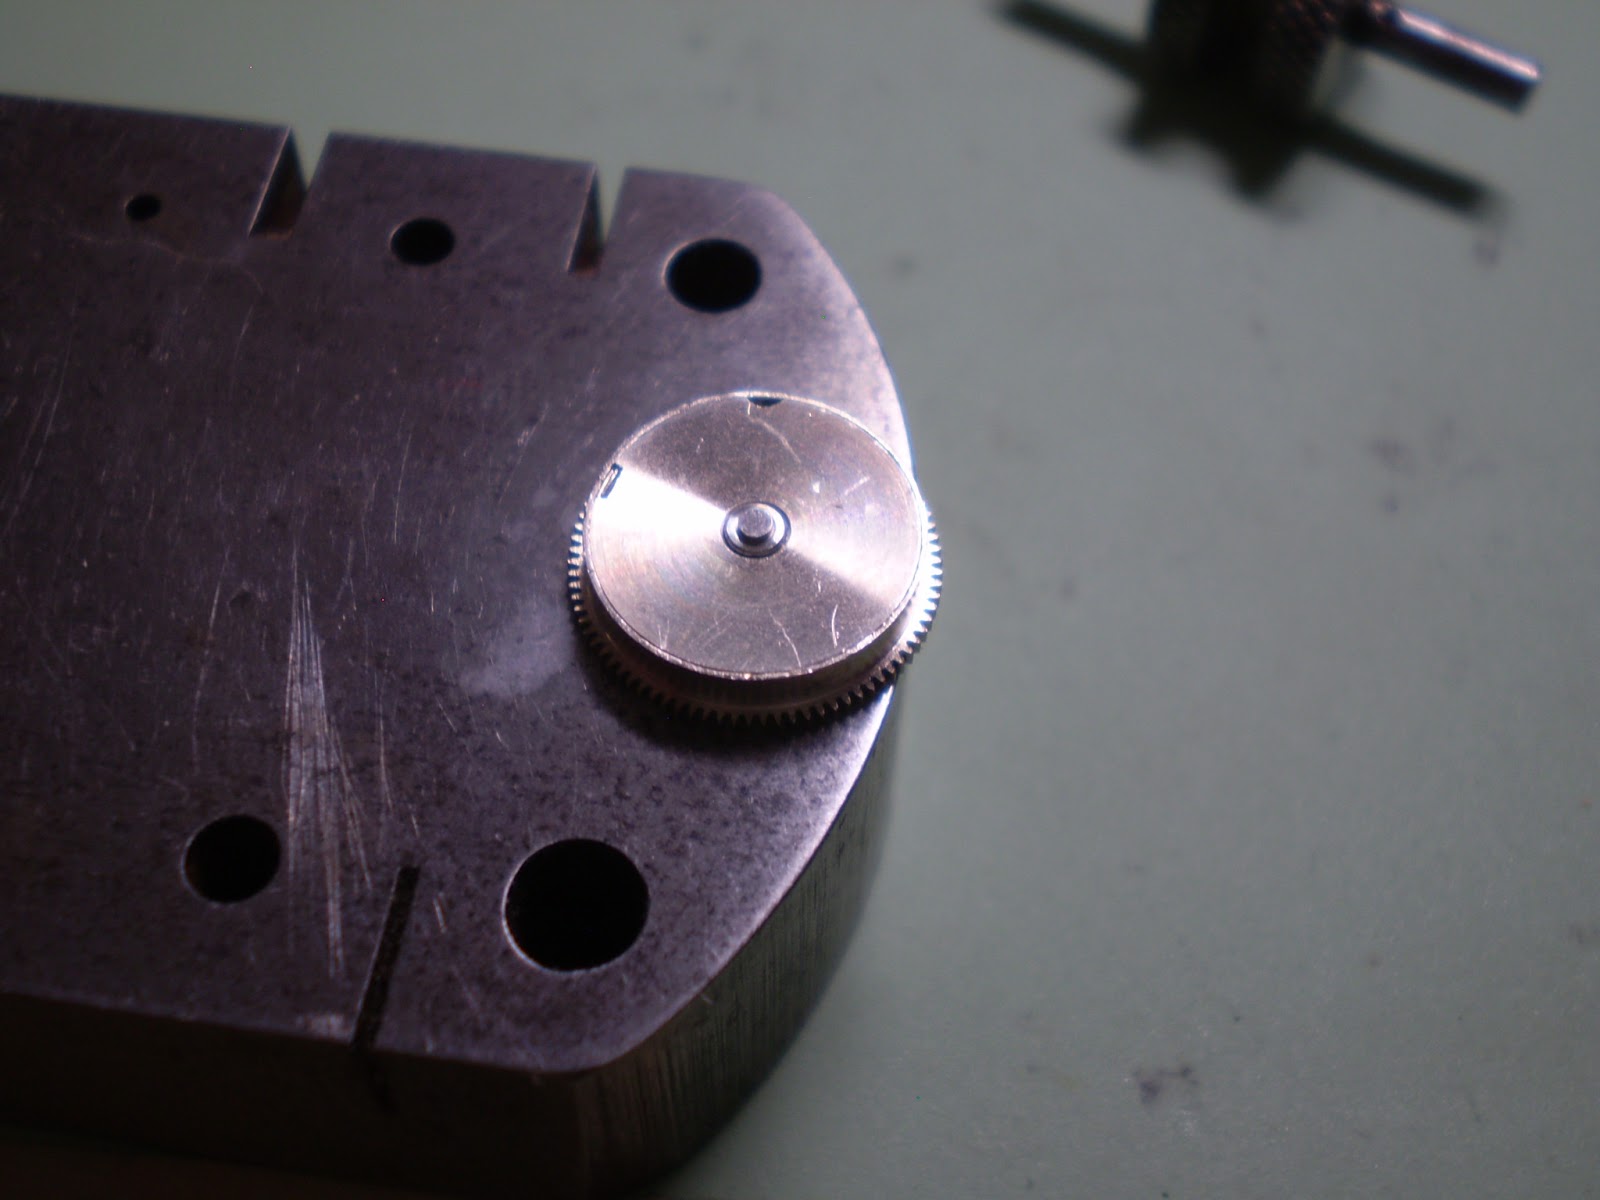
At this point, I like to install the Crown and Ratchet wheels, and the click. Start by greasing the area where the crown wheel rubs - this will be obvious on any movement that got much use! Also rub a little grease on the click post. On an 8/0 or 15/0 Elgin, you need to install the click spring before the ratchet wheel. Be careful doing this because the spring will try to escape. Hold the long end in a nice sturdy set of tweezers (I'm using #3s), and use either pegwood or another tweezer to push the 'shepherd's crook' end into the recesses.
Once it's in place, you can install the ratchet wheel. Make sure the square hole engages the square post on the barrel arbor!


Screw down the ratchet wheel screw,add the click and screw it down, making sure the end of the click spring falls between the two teeth of the click. Place the crown wheel, and grease the bearing surface where the crown wheel bushing rubs. Place the bushing, then screw down the crown wheel screw - COUNTERCLOCKWISE!!!

Now it's time to oil the lower pivots, and install the keyless works on the dial side. Oil the lower barrel arbor pivot with Clock Oil on the second smallest oiler. Then, using the smallest oiler, touch the oiler into your watch oil, then touch the tip to the junction of the pivot and the jewel, so the oil goes only into the bearing surface, and not outside the oil cup. In the loupe, you should be able to see the oil at the interface between the pivot and the jewel, but not in excess.
Finally, wipe some watch oil on the center wheel post to lubricate the cannon pinion, and install the cannon pinion. Some folks wait till later to add the cannon pinion, but if you do it before installing the dial train and keyless works, you won't have to worry about aligning the teeth of the minute wheel with the cannon pinion and possibly crushing them. This could cause the watch to stop at intervals. The cannon pinion should snap onto the post with a light pressure. If it just slides on with no resistance, it probably needs tightening. If it takes too much pressure, you risk driving out the upper center wheel jewel if you push too hard!


.
Next, install the clutch lever spring, again taking care to hold it with tweezers while pushing the loop into place over the post with pegwood or another tweezer.
Now install the setting lever, after greasing it where it engages the slot in the stem, and where it rubs on the clutch lever. Place it on the tip of the setting lever screw, then turn the screw until it has threaded and is pulling the setting lever down.


Grease the slot on the clutch lever, and the clutch teeth that engage the bevel pinion.
Now install the bevel pinion, clutch, and the dial train. Elgin says NOT to lubricate the minute wheel or setting wheel.
Grease the clutch lever post on the minute wheel clamp, and the post on the setting lever that the minute wheel clamp spring engages. Place the clutch lever on the post, then install the minute wheel clamp.
This step requires careful fiddling. You need to get the clutch lever tip engaged in the slot on the clutch; the clutch lever spring out from under the clutch lever and pushing the clutch lever toward the setting lever, the tip of the setting lever engaged in the notch in the clutch lever, and the minute wheel clamp spring engaging the setting lever post.
Sorry, no pictures! You'll have to figure it out! Just work carefully, and when everything is in place, the minute wheel clamp will drop into place, and the clutch lever and the clutch will work up and down easily. Add the two minute wheel screws and tighten them down.


Inserting the stem can help keep the clutch in place while you place the clutch lever. First, though, the stem must be greased on the tip where it enters the pillar plate, the flats where the clutch slides, and the bearing surfaces where the bevel pinion and setting lever tip engage the stem. Tighten down the setting lever screw went the setting lever is in the slot. Push and pull the crown several times, and turn the crown to test the setting and winding modes.
Now flip the watch over in the holder, and oil the upper pivots with Watch Oil. Note that the oiler touches only the center of the jewel.

If you don't get backlash, I hate to say this, but you'll need to address this before proceeding. It may even mean cleaning the whole thing again!
If the escape wheel teeth are not accessible when the watch is fully assembled, as on Elgin 8/0 movements, I oil 3-5 teeth of the escape wheel, on the impulse surfaces only, with Moebius 9415.
Now add the pallet. Check to make sure the lower pivot is in the jewel by gently attempting to move it side to side. Then place the pallet bridge. Be very careful to ensure the upper pivot is in the jewel before screwing the bridge down. This may take some fiddling - it always does for me!! Ever so gently, manipulate the fork end of the pallet while applying GENTLE pressure to the bridge. When the pivots are in place, the bridge unmistakeably drops into place.
Check for the glint of the pivot in the jewel hole before gently pushing the bridge down into place. This way, the screw should encounter no resistance until it bottoms out in the hole. Once this is done, check the pallet for freedom of motion, and wind the watch up just a bit.


Next, I turn the balance cock upside down and place it on my bench block, and lower the balance - roller side up - into place, with the pivot in the jewel and the stud in the hole. I gently push the stud all the way down, assuming it hasn't dropped in already, and tighten the stud screw.
Holding the balance cock in the tweezers, I flip it over. Check whether the hairspring falls between the regulator pins. If not, you may have to re-do installing the balance in the cock, or sometimes it's just a matter of gently moving the hairspring over into place. Remember it's fragile, and it is what determines how accurately your watch will run!
Now I lower it into the movement. Getting the roller on the right side of the fork is tricky, and different folks have different approaches. I like to flick the fork over to the inside banking pin, and bring the balance in with the cock rotated clockwise away from it. This places the roller to the right of the fork. Once the lower pivot is in place, I rotate the balance cock counterclockwise while lowering it into place. The roller goes right in.


If you've done it right, and if the balance is anywhere near being in beat, it should start running. Gently work the balance cock down into place, making sure the balance keeps turning. This will ensure that the upper pivot is going into the hole jewel. If it stops turning, stop pushing, and gently flick the wheel to start it again. If it keeps turning, keep going. If not, back up, and try again. Generally, it's easier than it sounds here!
Once the balance cock is all the way down, with the balance still turning, insert the screw and slowly tighten it down. The balance should be turning the whole time, and when you're finished, should keep turning.


Now that it's put together and running, slowly wind it up to full strength, and note how much amplitude you have. It's hard to tell in actual degrees by eye, without experience, but after a few, you'll have a pretty good idea what constitutes good balance motion.
This is also a good time to observe whether the balance is running true in both the flat and the round. That is, viewed from above, does the balance appear to wobble side to side; viewed from the side, does the rim appear to wobble up and down?
Observe the 'breathing' of the hairspring. Does it expand and contract evenly? Or is it pushed off to one side? If that's the case, you may need to adjust it. That is beyond the scope of this blog. Before attempting to adjust a hairspring, you need to read up on it, in Fried's "Watch Repairer's Manual" or in the section on Hairsprings in the TM9-1575 Technical Manual, or in another book on watchmaking. If you don't feel confident of your ability to do it without damaging the hairspring, just let down the power and put this one aside till you're ready.
Now that the movement is clean, lubed, and running, the next stage is regulation and casing. That will be the next post!
Hi, thanks for posting this.
ReplyDelete